
IDS - Animated Short Film - Production Diary - 002

This is the beginning of my production diary for my short animated film “ I Dont Steal “ ( Currently the working title. )
Project Update
I’ve gotten the father character artwork back from an artist with a few rounds of revisions and have started working on prepping the artwork for animation.
At this point I haven’t been set on how I plan to animate the characters. I have had some success with Adobe Character Animator in the past, but the more I used it, I knew it wouldn’t be flexible enough to do what I want.
At this point I made a test using After Effects and the Puppet pin tool to do the animation. I found a tutorial on rigging a face using puppet pins and expressions to create fake parallax. So I did a test run with the father artwork to see how it would look.

watch the test below.
After Effects Character Animation Test
This was a much better result than what I would get from Adobe Character Animator, I was able to give him small nuanced movements in his feet and his head turn parallax wasn’t bad.
So I rendered that animation out and started playing with how my characters could be composited into live action footage. And how would they be affected by lighting in the scene.
Shooting a test shot
As a VFX Artist I have migrated away from After Effects for my compositing and I am fully adjusted to using the node compositing workflow with Davinci Resolve Fusion, and the standalone version Fusion Studio.
I pulled my phone out and shot some test footage of a scene that had really dramatic and contrasting lighting so I could work on how adding scene light direction from a hot spot down to shadows would look like.
Fusion Studio Lighting Composite test v01
Experimenting here with just getting some direction lighting and seeing how the vector art looks when its toned down to mimic shadows.
Fusion Studio Lighting Composite test v02
In this lighting test I had the idea to run the original character animation through Fusion’s Relight node where it will analyze the footage and give its best approximation of the shapes and falloff of a scene to be able to change light direction in post. Normally this is for Live action footage, but why not experiment with it in this situation?
Below you can see what the results are from the relight node being generated off of the artwork.

Its really not bad at all and its all processed so its basically free work done for you.
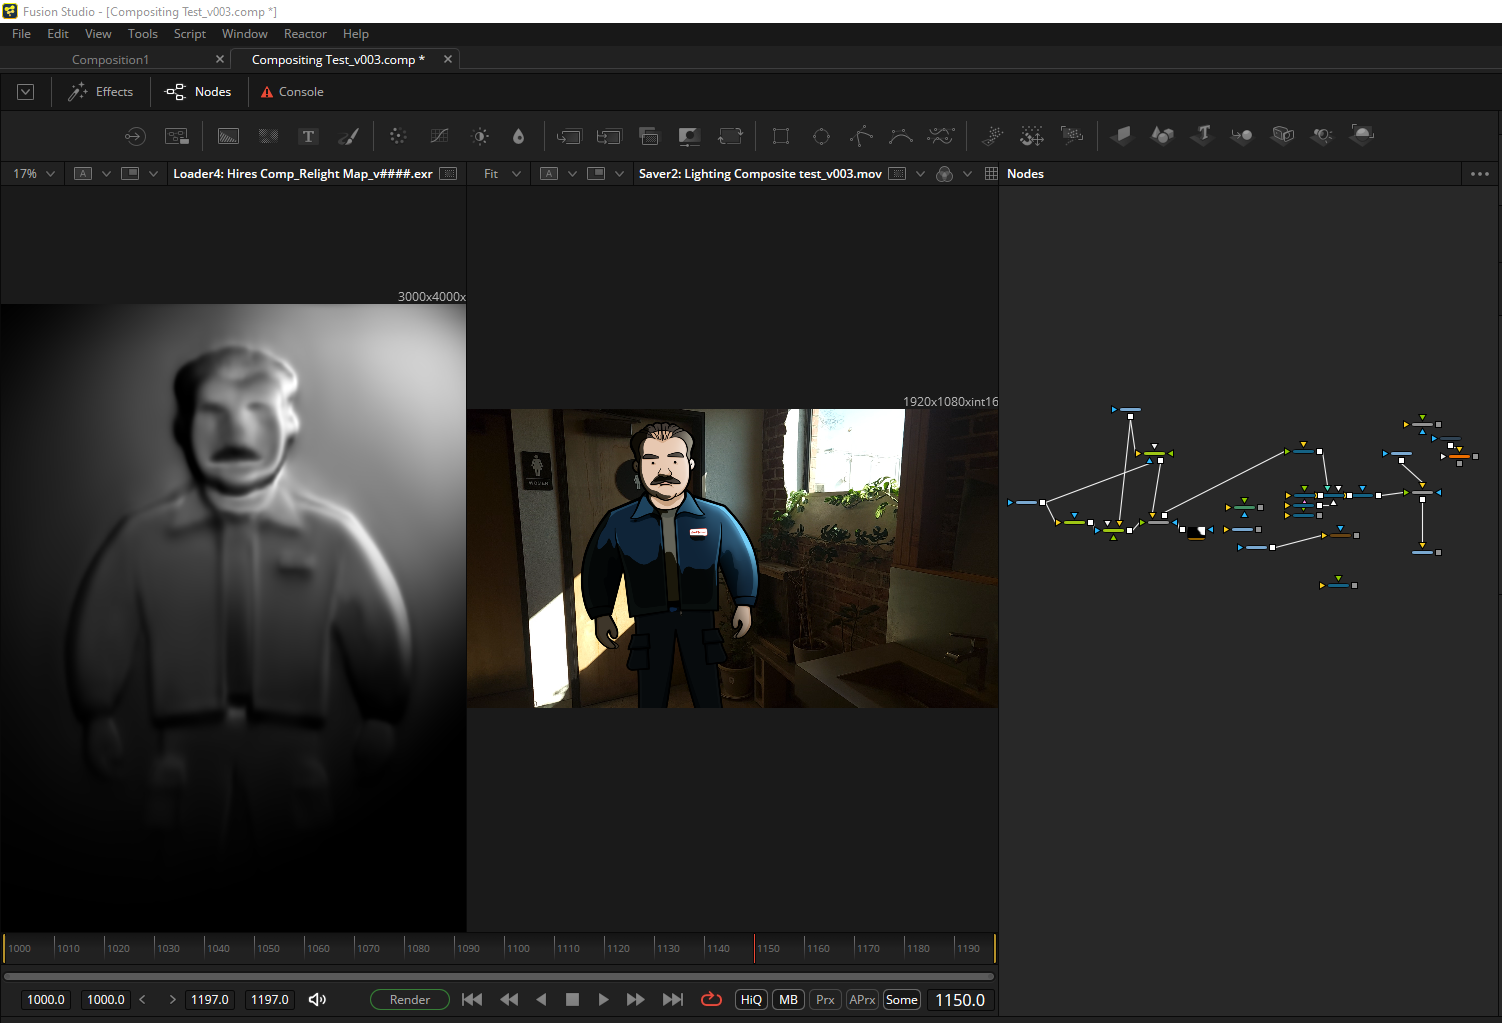
Fusion Studio Lighting Composite test v03
In this v03 test I used some nodes to compress down the relight pass so it had less gradients and would produce more of a cell shaded look that would potentially match the vector artwork more.
Fusion Studio Lighting Composite test v04
In this version I actually ditched the relight node process, it was a little time intensive and way too resource heavy, I would have to process the animation through it, render out a saver node to bake it down then bring that render back in to use it. And if I wanted to tweak any of the settings in the relight node, I’d have to repeat that process again.
I was browsing the WeSuckLess Forum ,and if you’re a Fusion user you should be there too, and in the development forum I found a user who created some specific macros meant for animation in Fusion.
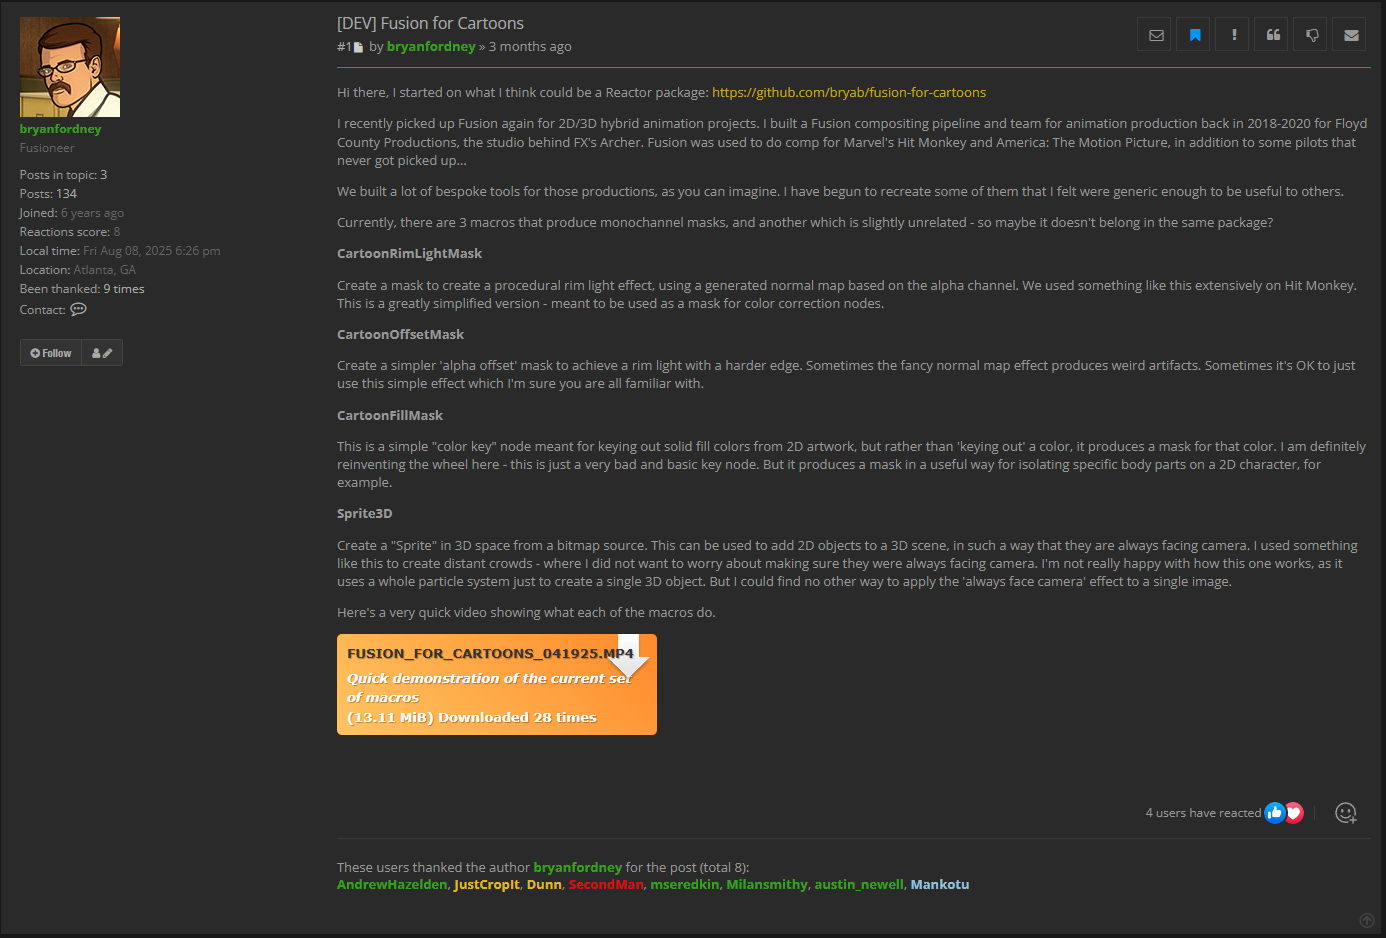
Currently, there are 3 macros that produce monochannel masks, and another which is slightly unrelated.
CartoonRimLightMask
Create a mask to create a procedural rim light effect, using a generated normal map based on the alpha channel. We used something like this extensively on Hit Monkey. This is a greatly simplified version - meant to be used as a mask for color correction nodes.
CartoonOffsetMask
Create a simpler 'alpha offset' mask to achieve a rim light with a harder edge. Sometimes the fancy normal map effect produces weird artifacts. Sometimes it's OK to just use this simple effect which I'm sure you are all familiar with.
CartoonFillMask
This is a simple "color key" node meant for keying out solid fill colors from 2D artwork, but rather than 'keying out' a color, it produces a mask for that color. I am definitely reinventing the wheel here - this is just a very bad and basic key node. But it produces a mask in a useful way for isolating specific body parts on a 2D character, for example.
Sprite3D
Create a "Sprite" in 3D space from a bitmap source. This can be used to add 2D objects to a 3D scene, in such a way that they are always facing camera. I used something like this to create distant crowds - where I did not want to worry about making sure they were always facing camera. I'm not really happy with how this one works, as it uses a whole particle system just to create a single 3D object. But I could find no other way to apply the 'always face camera' effect to a single image.
What perfect timing to find something like this when i’m actively developing the very thing he made those tools for, its pays to procrastinate huh?
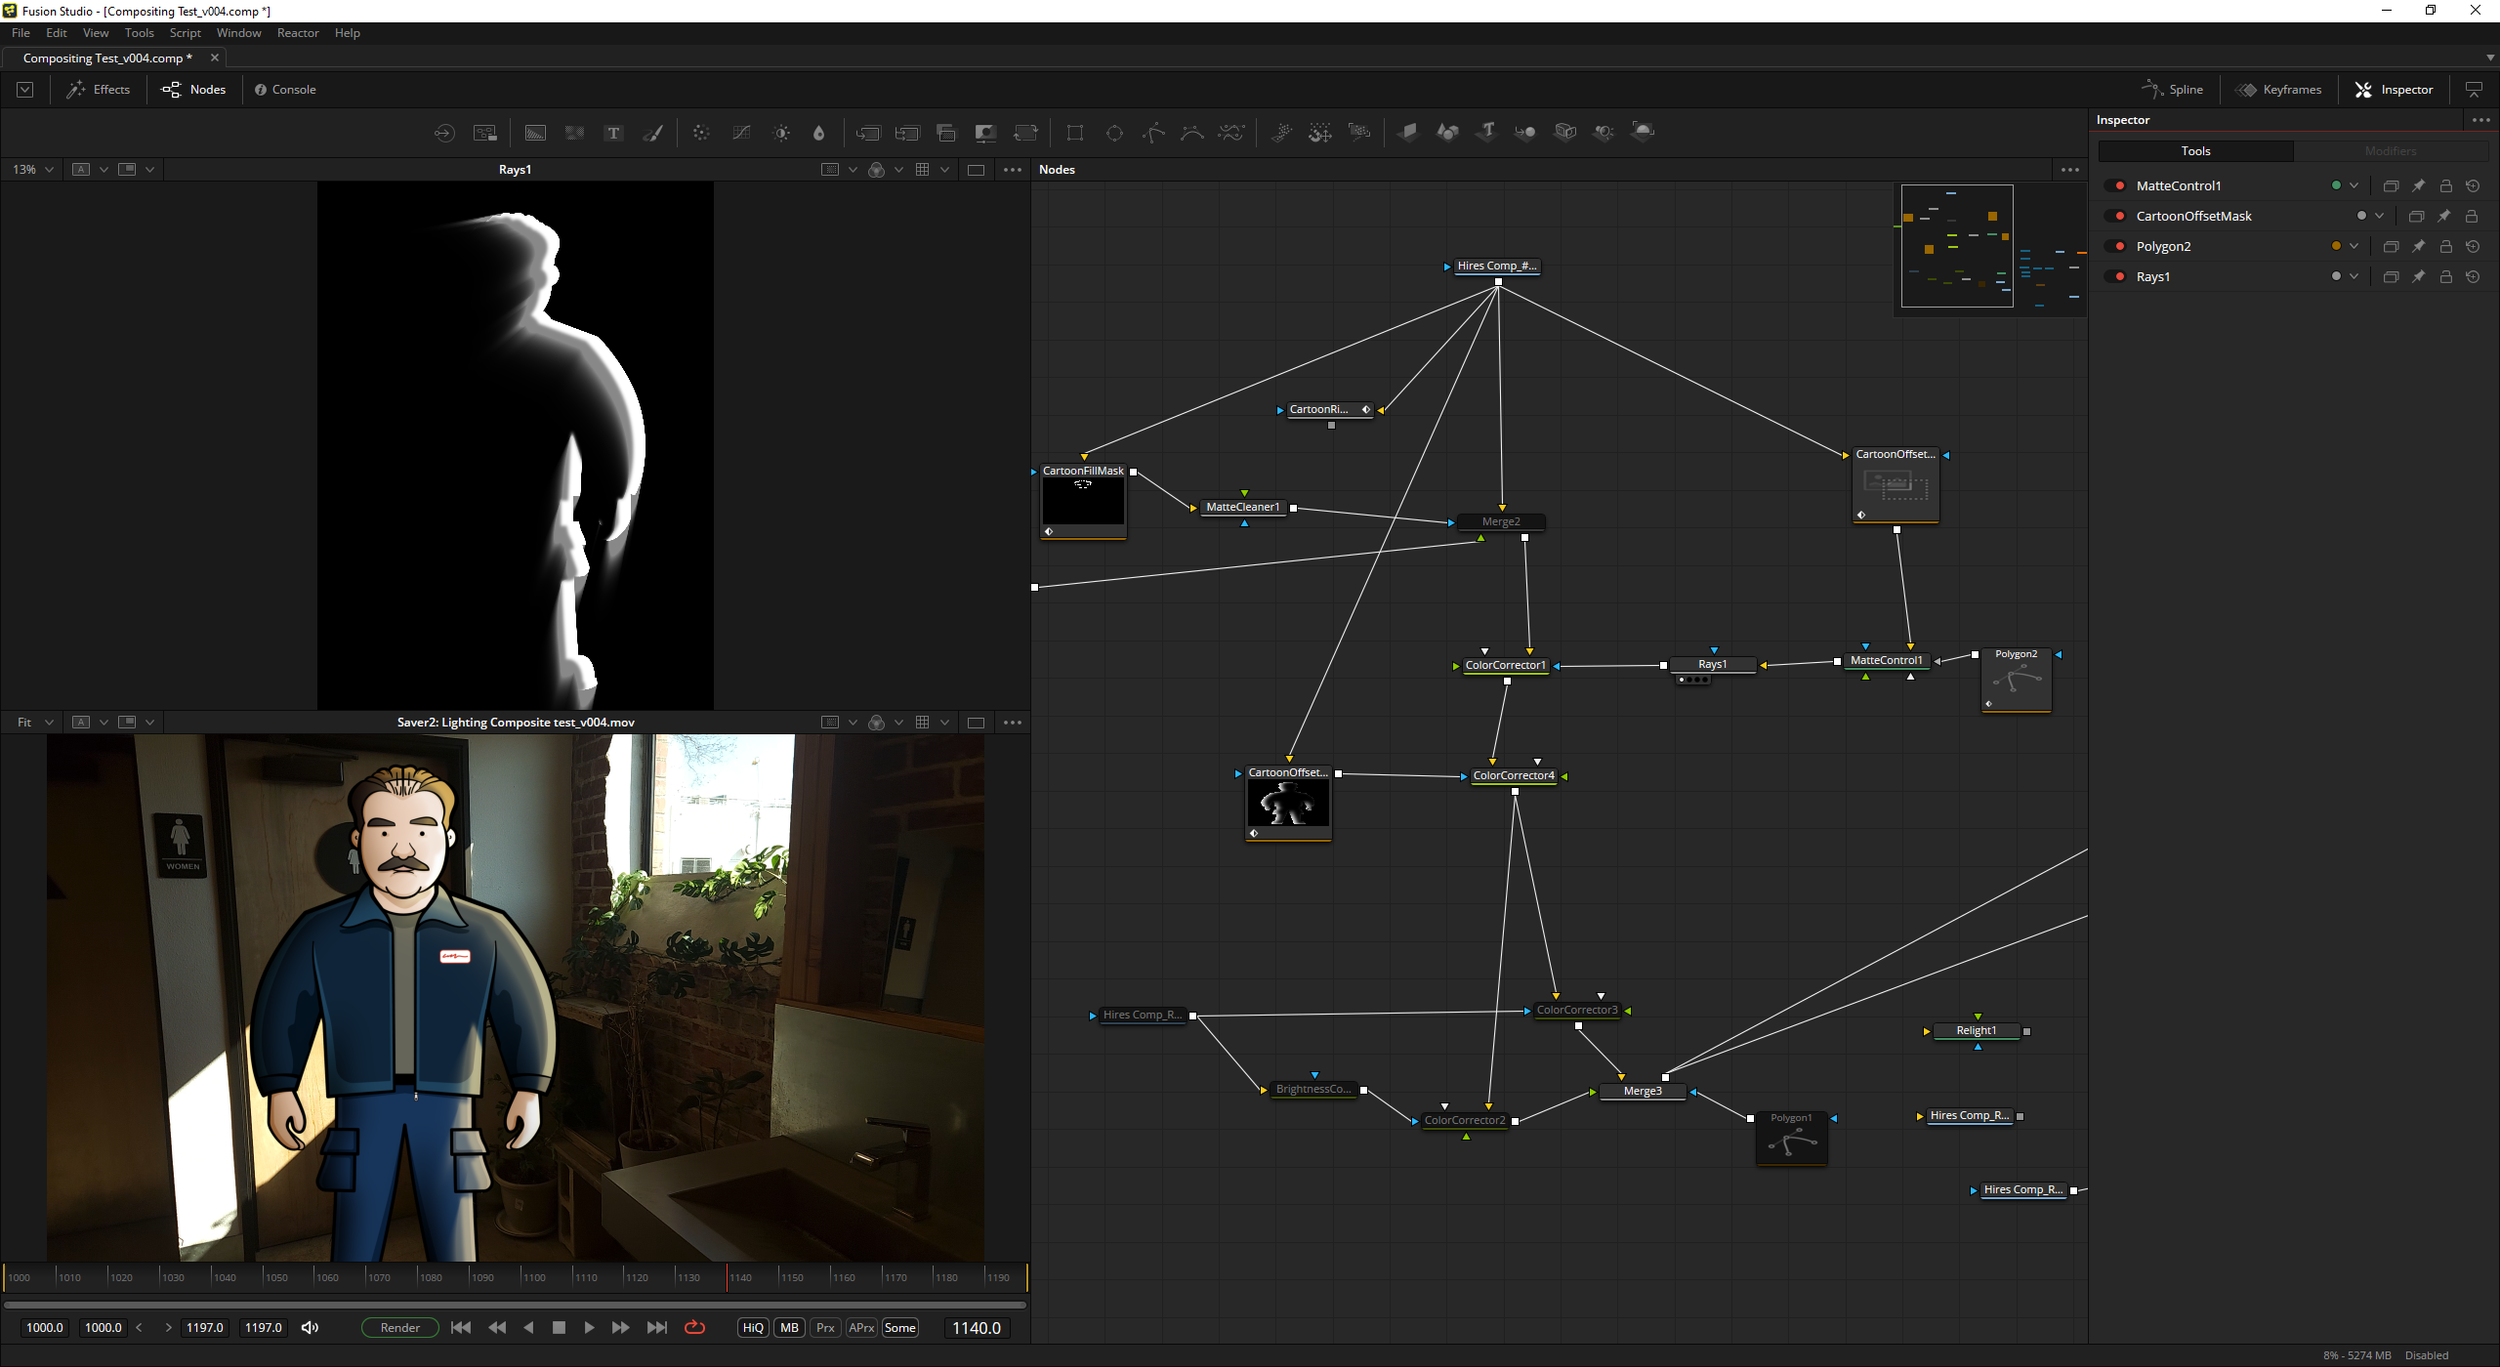
So this v04 Animation is composited using these tools above. Overall I think I like this one the most and the tools were super easy and very efficient to use.

Check out Production Diary 003
This is part Three of my production diary for my short animated film “ I Dont Steal “. Where I go over the beginning stages of Learning Moho Animation software to introduce into my short film workflow.
Current Progress
Currently I have the dad artwork drawn up and have the beginning process of what lighting compositing ill do.
Next steps
Next steps that I’ll need to work on are finishing up the animatic, so that I’ll know exactly what shots to get when I go onset for shooting plates.
Continue to refine how I will animate my characters.
Want to help out?
This is a passion project that I am ultimately doing both in my own time and my own money as well as calling in favors when I can. If you’d like to help me out in any way I’ve added a donation option below if you feel the want/need to help contribute to this project. Anyone who donates will have a credit added in the film.
If you can’t donate please consider signing up to the email list to get updates on the project as it progresses along.